In this blog, we’ll learn about ‘Snort’, an Open Source Intrusion Prevention System (IPS) that helps protect computer networks by analysing the incoming network packets against a pre-defined set of rules.
This aids in intrusion detection and is perfect for Blue Teams defending against cyber threats. Understanding Snort can strengthen a company’s cybersecurity defenses, making their networks safer. We’ll cover the basics and show how to write rules with easy examples to follow.
Table of Contents
What is Snort?

Snort is a tool to detect and prevent cyber attacks, like intrusions and malware. It’s like a digital guard that watches over your network and alerts you if anything suspicious happens.
“Snort is the foremost Open Source Intrusion Prevention System (IPS) in the world. Snort IPS uses a series of rules that help define malicious network activity and uses those rules to find packets that match against them and generates alerts for users. “
– Snort.org
How Snort works ?
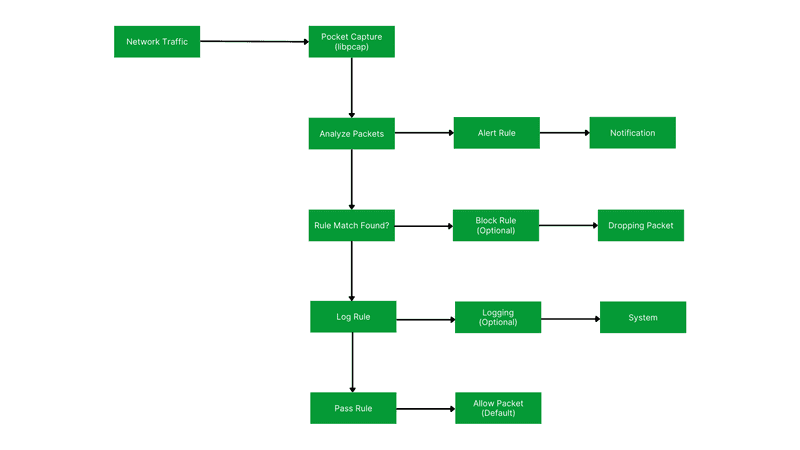
Snort is like a watchful guardian for computer networks. It sits quietly, observing all the data packets passing through the network. When it notices something suspicious, it doesn’t hesitate to sound the alarm. This is how it works.
Network Traffic Capture : The process starts with capturing network traffic using libpcap. This captured traffic is stored in a pcap format for further analysis.
Analyze Packets : Snort analyzes the captured packets to identify malicious activity.
Match Rules : The captured packets are then matched against a user-defined rule set.
Rule Match Found: This decision point determines if there’s a match between a packet and a rule.
Alert : If there’s a match, Snort generates an alert indicating a potential threat.
Block Rule (Optional) : This decision point determines if Snort should block the traffic based on the matched rule.
Log Collecting (Optional): This step logs the rule details even if the traffic is not blocked.
Pass Rule : If blocking is not enabled or there’s no match, the traffic is allowed to pass through the network.

Snort Installation
For linux ( debian and centos ) you can install snort using the following command.
sudo apt install snort (for Debian/Ubuntu)
sudo yum install snort (for RedHat/CentOS)
For other OSes you can follow the detailed installation guide on their website here – snort installation
Snort Rules
Snort rules are sets of conditions and actions used by the Snort “Intrusion Detection System” to analyze network traffic. They specify criteria like patterns or signatures that, when detected in network packets, trigger actions such as generating alerts or blocking traffic.
Snort rules are like a bouncer’s cheat sheet for your network. They tell the bouncer (Snort) who’s okay (safe traffic) and who to be suspicious of (bad guys trying to get in). This keeps your network safe!
Types of Snort Rules
- Snort Community Ruleset – Free; Open-source collection of rules maintained by the Snort community.
- Snort Paid Ruleset – Paid; New Up-to-date rulesets with many more benefits. Found on snort.org/products.
- Custom Rulesets – Create your own personalized Rulesets.
Deep Dive into the Custom Rule-sets

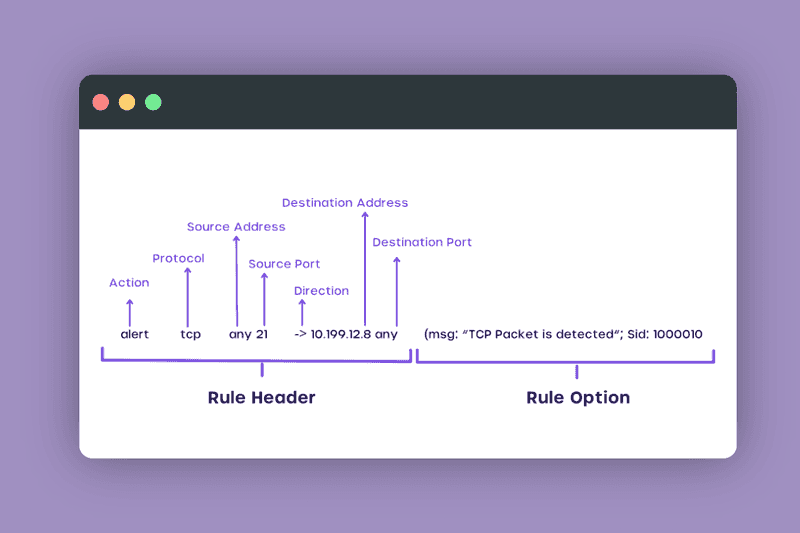
Rule Header
- Action
This field specifies the action that Snort should take if the rule matches a packet. In the example, the action is set to alert, which means Snort will generate an alert message if it detects a packet that matches the rule. - Protocol
This field specifies the network protocol that the rule applies to. In the example, it shows TCP (Transmission Control Protocol). - Source Address
This field specifies the IP address that the rule applies to. In the example, it shows any source address. - Source Port
This field specifies the port number on the source device that the rule applies to. In the example, it shows any source port. - Direction
This field specifies the direction of the traffic that the rule applies to. In the example, the direction is set to ->, which means the rule applies to inbound traffic (traffic going from the source to the destination). - Destination Address
This field specifies the IP address that the rule applies to. In the example, it shows any destination address. - Destination Port
This field specifies the port number on the destination device that the rule applies to. In the example, it shows destination port 21, which is commonly used for FTP (File Transfer Protocol) traffic.
Rule Option
Provide more specific details about the traffic you want to monitor.
- msg: This option allows you to specify a message that will be included in the alert if the rule is triggered.
- sid: This option allows you to specify a unique identifier for the rule.
- classtype: This option allows you to specify the classification of the rule, such as malware, exploit, or scan.
- content: This option allows you to search for specific patterns in the content of the traffic payload.
- flow: This option allows you to specify conditions that must be met by the traffic flow in order for the rule to be triggered.
Example Of Custom Rules
Block SQL Injection Attempts
Rule:
action: alert
protocol: tcp
source ip: any
source port: any
destination ip: your_web_server_ip
destination port: 80 (or 443 for HTTPS)
content: "|*WHERE*| |*UPDATE*| |*SELECT*|"; sid:100002; msg:"Potential SQL Injection Attempt"; classtype: attack-scriptsTCP traffic on ports 80 (HTTP) or 443 (HTTPS) destined for your web server. It searches for keywords commonly used in SQL injection attempts within the content of the packet payload. If a match is found, an alert is generated. Hands On Attack and Defence Using Snort
Rule Used Here
alert tcp any any -> 192.168.78.130 80 (msg:"DOS DETECTED"; flags: S; sid:1000002;)alert: This keyword specifies that Snort should generate an alert when the rule matches.tcp: Specifies that the rule applies to TCP traffic.any any: Matches any source IP address and any source port.->: Indicates the direction of the traffic flow.192.168.78.130 80: Specifies the destination IP address (192.168.78.130) and port (80) where the attack is detected.(msg:"DOS DETECTED";): Provides a descriptive message that will be included in the alert.flags: S: Matches TCP packets with the SYN flag set, indicating the start of a connection.sid:1000002: Specifies a unique identifier for the rule.
TCP SYN flood attacks targeting victim at IP address 192.168.78.130 on port 80.
hping is a command-line tool used for network testing and DoS attacks. Used in the video. Key Takeaways
- Snort, an Open Source Intrusion Prevention System (IPS) and it’s workings
- Breaking down Snort’s rules
- Creating Custom Rule
- Practical Application of Snort to Detect DOS Attack
Snort helps you protect against cyber threats.
Install it, understand its rules, and use it to defend your network.
Thanks ! Hope you learnt something.
Why Businesses Trust SecureMyOrg For Comprehensive Network Security
At SecureMyOrg, we uncover and fix all possible security vulnerabilities of mobile and web, while providing solutions to mitigate risks. We are trusted by renowned companies like Yahoo, Gojek and Rippling, and with 100% client satisfaction, you’re in safe hands!


Some of the things people reach out to us for –
- Building their cybersecurity program from scratch – setting up cloud security using cost-effective tools, SIEM for alert monitoring, building policies for the company
- Vulnerability Assessment and Penetration Testing ( VAPT ) – We have certified professionals, with certifications like OSCP, CREST – CPSA & CRT, CKA and CKS
- DevSecOps consulting
- Red Teaming activity
- Regular security audits, before product release
- Full time security engineers.
Relevant Posts

Top Cybersecurity Threats Facing Businesses In 2026
Businesses entering 2026 face a security landscape that is more complex, more interconnected, and far less forgiving than in previous years. Cybersecurity threats no longer

Top 5 Security Weaknesses Cloud-Native Apps Commonly Ignore
Cloud-native applications promise speed, flexibility, and scalability. Teams ship features faster, infrastructure adapts automatically, and operational overhead drops. Yet many organizations discover later that security

Why Weak Serverless Application Security Puts Your Business at Risk
Weak security in serverless environments often goes unnoticed until it leads to real damage. Misconfigured triggers, broad permissions, and poor visibility can expose sensitive data and disrupt business operations. Understanding where the risks appear is the first step toward building safer, more reliable serverless applications.

What Is Penetration Testing as a Service?
Penetration testing as a service (PTaaS) lets experts simulate real attacks to uncover vulnerabilities before hackers do. This guide explains the process, benefits, and costs, helping businesses strengthen defenses with predictable, ongoing security checks.

How To Inspect Encrypted Traffic Without Breaking Privacy
Network administrators face a challenge: securing systems while respecting privacy. This guide explains how to inspect encrypted traffic without breaking privacy using metadata, anomaly detection, and machine learning ensuring visibility, compliance, and trust.

How to Audit Infrastructure as Code (IaC) for Security Vulnerabilities
Discover how to audit Infrastructure as Code (IaC) for security vulnerabilities with this practical guide. Learn to scan IaC files using tools like Checkov, fix issues like exposed resources, and integrate audits into CI/CD pipelines. Protect your cloud systems from misconfigurations and ensure compliance with clear, actionable steps.
