Wireshark is one of the most powerful tools in the arsenal of network professionals and cybersecurity experts. As a network protocol analyzer, it allows users to capture, inspect, and analyze network traffic in real time. This blog dives into the fundamentals of Wireshark, its features, use cases, and best practices for leveraging its capabilities effectively.
Table of Contents
What is Wireshark?

Wireshark is an open-source tool that provides deep insights into network traffic by capturing packets as they traverse a network. Each captured packet can be dissected to reveal its protocols, headers, payloads, and more. Initially released in 1998 under the name “Ethereal,” Wireshark has evolved into the gold standard for network traffic analysis.
Key Features of Wireshark
Packet Capture: Real-time traffic capture from wired or wireless interfaces.
Protocol Analysis: Support for thousands of network protocols.
Filtering: Apply display filters to focus on specific packets.
Live Traffic Analysis: Monitor and analyze traffic as it flows.
Export Options: Save captured data in various formats for later analysis.
Cross-Platform Compatibility: Available for Windows, macOS, and Linux.
Visualization: Generate statistics and graphs to visualize traffic trends.
Why Use Wireshark?
Wireshark’s versatility makes it indispensable for various tasks:
1. Network Troubleshooting
Identify bottlenecks, packet loss, and misconfigurations within a network. For instance, by analyzing TCP retransmissions, you can pinpoint issues causing slow performance.
2. Security Analysis
Detect malicious traffic, such as unauthorized data exfiltration or denial-of-service attacks. By analyzing packets, you can uncover hidden threats.
3. Protocol Debugging
Understand how different protocols interact within your network. This is particularly useful for developers creating or maintaining applications reliant on network communication.
4. Learning Tool
Wireshark is an excellent tool for students and professionals to learn about networking by observing protocol behavior in real-time.

Installing Wireshark
Wireshark can be downloaded from its official website. Installation steps vary by operating system:
Windows:
Download the installer.
Run the installer and follow the prompts.
During installation, opt to install WinPcap or Npcap for packet capturing.
macOS:
Install Homebrew if it’s not already installed.
Use the command:
brew install --cask wiresharkLinux:
Use the package manager specific to your distribution:
sudo apt install wireshark  # For Debian/Ubuntu
sudo yum install wireshark # For Red Hat/CentOS- Grant non-root users permission to capture packets:
sudo usermod -aG wireshark <username>
Getting Started with Wireshark
Once installed, you can start analyzing network traffic in a few simple steps:
1. Select a Network Interface
When you launch Wireshark, you’ll see a list of available network interfaces. Choose the one you want to capture traffic from (e.g., Ethernet, Wi-Fi).
2. Start Capturing Traffic
Click the blue shark fin icon to begin capturing packets. You’ll see live data streaming in the main window.
3. Stop Capturing Traffic
When you’re done, click the red square icon to stop capturing.
4. Save Captures
Save your captured data for future analysis by navigating to File > Save.
Understanding the Wireshark Interface
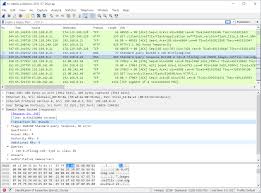
Wireshark’s interface is divided into three main sections:
Packet List Pane: Displays all captured packets with details like time, source, destination, protocol, and info.
Packet Details Pane: Shows a hierarchical view of the selected packet’s protocol layers.
Packet Bytes Pane: Displays the raw data of the selected packet in hexadecimal and ASCII.
Using Filters in Wireshark
Wireshark’s filtering capabilities allow you to focus on specific packets of interest. Filters can be applied at two levels:
1. Capture Filters
Set before starting a capture to limit the packets Wireshark collects. For example:
port 80  # Capture only HTTP traffic
host 192.168.1.1  # Capture traffic to/from a specific IP
2. Display Filters
Applied after capturing traffic to narrow down the displayed packets. Common examples include:
ip.addr == 192.168.1.1: Show packets involving a specific IP.tcp.port == 443: Display only packets using TCP port 443.dns: Show only DNS traffic.
Tips for Writing Filters
Use the
Expressionbutton in the filter bar for guidance.Combine filters with logical operators (
and,or,not).
Common Use Cases for Wireshark
1. Analyzing HTTP and HTTPS Traffic
Monitor web traffic to identify issues or understand client-server communication. For example:
Filter HTTP requests:
http.request.Analyze latency: Look at the time between HTTP requests and responses.
2. Inspecting DNS Queries
Investigate DNS resolution issues or detect DNS-based attacks:
Filter for DNS traffic:
dns.Look for anomalies, such as excessive queries or unknown domains.
3. Examining TCP Connections
Understand connection setups, data flow, and potential issues:
Filter for TCP traffic:
tcp.Analyze the TCP handshake: Check for SYN, SYN-ACK, and ACK packets.
Identify retransmissions: Look for duplicate ACKs or out-of-order packets.
4. Detecting Security Threats
Spot malicious activity like ARP spoofing or DDoS attacks:
Filter ARP packets:
arp.Look for unusual traffic patterns, such as repeated requests from the same source.
Advanced Wireshark Features
1. Follow Streams
Reassemble streams for protocols like TCP, HTTP, or TLS. Right-click on a packet and choose Follow > TCP Stream to view communication as a single conversation.
2. Export Objects
Extract files or data transferred over protocols like HTTP or SMB. Navigate to File > Export Objects and choose the desired protocol.
3. Protocol Statistics
Generate statistics to visualize traffic patterns:
Navigate to
Statistics > Protocol Hierarchyfor a breakdown of protocols.Use
Statistics > IO Graphsto plot traffic trends over time.
4. Decryption
Wireshark can decrypt encrypted traffic, such as HTTPS or WPA2 Wi-Fi, provided you have the necessary keys or certificates.
Best Practices for Using Wireshark
Capture with Purpose: Use capture filters to avoid collecting unnecessary data.
Analyze in a Controlled Environment: Avoid capturing sensitive or unauthorized data.
Regular Updates: Keep Wireshark updated to support the latest protocols.
Understand Protocols: Familiarity with networking protocols enhances your analysis.
Save Captures: Document and save your work for future reference.
Limitations of Wireshark
While Wireshark is a robust tool, it does have limitations:
Resource Intensive: Capturing and analyzing large volumes of traffic can strain system resources.
Encrypted Traffic: Limited visibility into encrypted data without decryption keys.
Steep Learning Curve: Requires knowledge of networking and protocols for effective use.
Conclusion
Wireshark is a cornerstone tool for network analysis, offering unparalleled insights into traffic patterns, troubleshooting, and security. By mastering its features and understanding how to apply them effectively, you can become proficient in diagnosing network issues and detecting threats. Whether you’re a seasoned professional or a networking enthusiast, Wireshark’s capabilities make it an essential skill in today’s digital landscape.
Download Wireshark today and start exploring your network like never before!
Why Businesses Trust SecureMyOrg for Comprehensive Network Security
At SecureMyOrg, we uncover and fix all possible security vulnerabilities of mobile and web, while providing solutions to mitigate risks. We are trusted by renowned companies like Yahoo, Gojek and Rippling, and with 100% client satisfaction, you’re in safe hands!


Some of the things people reach out to us for –
- Building their cybersecurity program from scratch – setting up cloud security using cost-effective tools, SIEM for alert monitoring, building policies for the company
- Vulnerability Assessment and Penetration Testing ( VAPT ) – We have certified professionals, with certifications like OSCP, CREST – CPSA & CRT, CKA and CKS
- DevSecOps consulting
- Red Teaming activity
- Regular security audits, before product release
- Full time security engineers.
Relevant Posts

Top Cybersecurity Threats Facing Businesses In 2026
Businesses entering 2026 face a security landscape that is more complex, more interconnected, and far less forgiving than in previous years. Cybersecurity threats no longer

Top 5 Security Weaknesses Cloud-Native Apps Commonly Ignore
Cloud-native applications promise speed, flexibility, and scalability. Teams ship features faster, infrastructure adapts automatically, and operational overhead drops. Yet many organizations discover later that security

Why Weak Serverless Application Security Puts Your Business at Risk
Weak security in serverless environments often goes unnoticed until it leads to real damage. Misconfigured triggers, broad permissions, and poor visibility can expose sensitive data and disrupt business operations. Understanding where the risks appear is the first step toward building safer, more reliable serverless applications.

What Is Penetration Testing as a Service?
Penetration testing as a service (PTaaS) lets experts simulate real attacks to uncover vulnerabilities before hackers do. This guide explains the process, benefits, and costs, helping businesses strengthen defenses with predictable, ongoing security checks.

How To Inspect Encrypted Traffic Without Breaking Privacy
Network administrators face a challenge: securing systems while respecting privacy. This guide explains how to inspect encrypted traffic without breaking privacy using metadata, anomaly detection, and machine learning ensuring visibility, compliance, and trust.

How to Audit Infrastructure as Code (IaC) for Security Vulnerabilities
Discover how to audit Infrastructure as Code (IaC) for security vulnerabilities with this practical guide. Learn to scan IaC files using tools like Checkov, fix issues like exposed resources, and integrate audits into CI/CD pipelines. Protect your cloud systems from misconfigurations and ensure compliance with clear, actionable steps.
